Webhooks are a fundamental way of performing API integrations. The alternative is to periodically have your server query the API provider for updates. However, depending on how often you do this, it may not be a scalable option for the API provider due to the sheer volume of requests that could incur.
The concept of webhooks is simple: instead of the client pulling information (e.g. polling for updates), webhooks push information to clients when the API provider identifies an event that the client is subscribed to. This works fine when the client is publicly accessible, but how do you enable webhooks for private networks?
Problem
How do I design a solution such that the raspberry PIs on my private network can still receive webhooks?
Requirements
1. Solution Must Be Secure
As a security engineer, this is top of mind for me.
I don’t want to setup port forwarding on my router to directly expose my raspberry PIs to the internet. Not only does this mean I need to setup an authenticated reverse proxy for each of my devices, but it would also require me to announce my home IP address to the world.
I also wanted to decrease the risk of drive-by attacks. My personal threat model includes a dedicated, (non-targeted) skilled attacker, and lowering the risk of unexpected access to my private network is desirable.
2. Solution Must Scale
These tunnels are expected to be long-lived, and multiple tunnels will be created for the various different raspberry PIs I have. The solution must offer capabilities to create as many long-lived tunnels as I need, without excess infrastructure or maintenance costs.
3. Solution Must Be Cost-Effective
Ultimately, I’m a hobbyist and am not willing to spend more for a managed, “closer-to-enterprise” solution. The use case of these webhooks will be valuable, but not so valuable for a recurring cost of $X/month.
Solution
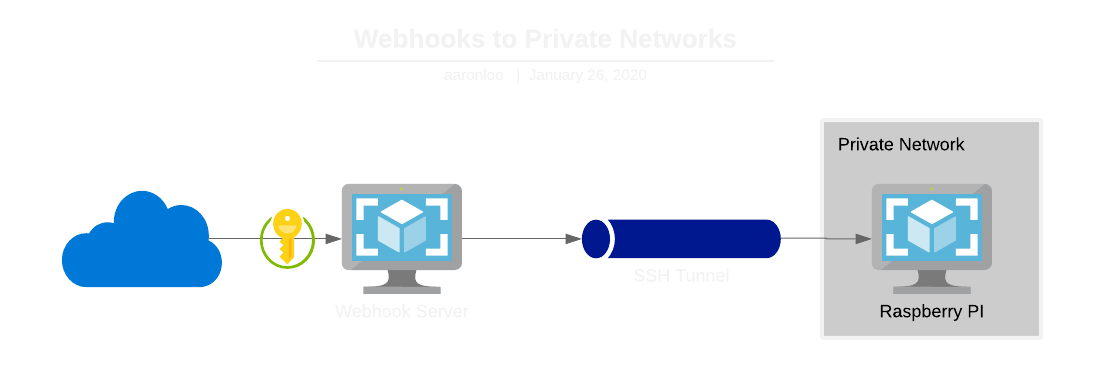
TL;DR: the system I ended up with utilizes SSH tunnels with an nginx reverse proxy, then configuring my webhook server to redirect requests to it.
Prerequisites
To follow this step-by-step guide, you will need the following:
- Publicly accessible server (e.g. DigitalOcean droplet)
- Raspberry PI on private network
Step #1: Configuring SSH Tunnels
SSH tunnels allow you to create a secure tunnel to a given destination, and either proxy traffic through it, or allow the remote server to use it to send traffic to you. We will leverage the latter functionality since it’s the only way for the public server to be aware of the private one.
pi@private $ python -m http.server 8000
pi@private $ ssh -R 8500:localhost:8000 ubuntu@public
ubuntu@public $ curl localhost:8500
Let’s break down this proof of concept.
-
Line 1 spins up a HTTP server to listen on port 8000. If all goes well, this should receive requests from the public server.
-
Line 2 creates a SSH tunnel from your public server’s port 8500 to your raspberry pi’s port 8000. This should open a shell on the public server, if you could have previously connected via SSH from your raspberry PI.
Note that In this example, ubuntu@public is merely used as an example for wherever your public server is.
-
Line 3 tests the connection. When you send a request to the public server’s port 8500, it should tunnel to your private device and receive a valid response served via line 1.
Success? If so, let’s productionize it.
Let’s first create a new user on the raspberry PI, so that if our public box gets compromised and an attacker leverages this SSH tunnel, the amount of things they can do on the device is lessened.
pi@private $ sudo useradd --create-home tunnel
Then, let’s configure this new user’s SSH configs, including generating a new ssh key.
pi@private $ sudo su -c '/bin/bash' -- tunnel
tunnel@private $ mkdir -p ~/.ssh/controlmasters
tunnel@private $ ssh-keygen -t ed25519 -b 4096 -c 'tunnel@private'
tunnel@private $ vim ~/.ssh/config
Host public
    HostName {server_ip}
    User ubuntu
    IdentityFile ~/.ssh/id_ed25519
    ControlMaster auto
    ControlPath ~/.ssh/controlmasters/%r@%h:%p
Note the use of the ControlMaster option. This allows us to easily check the status of our SSH tunnel with ssh -O check public or close the tunnel with ssh -O stop public so we don’t need to rely on some ps aux | grep | kill chain.
With this new public key, we can add it to the authorized keys on the public server, to allow this new user to connect via SSH.
ubuntu@public $ echo "$PUBLIC_KEY" >> ~/.ssh/authorized_keys
Finally, let’s make sure this tunnel is managed by systemd, so it starts up on boot.
pi@private $ sudo vim /etc/systemd/system/webhook-tunnel.service
[Unit]
Description=WEBHOOK-TUNNEL
After=network.target

[Service]
User=tunnel
ExecStart=ssh -R 8500:localhost:8000 public -N
ExecStop=ssh -O stop public

[Install]
WantedBy=multi-user.target
pi@private $ sudo systemctl daemon-reload
pi@private $ sudo systemctl start webhook-tunnel
pi@private $ sudo systemctl enable webhook-tunnel
Couple of notes here:
- Note that the
Userfield is set totunnel, the user that we just created. - The
ExecStartcommand is very similar to our proof of concept, with the addition of the-Nflag which specifies no shell to open. Also, we replacedubuntu@publicwith just public, since the ssh config file knows how to map this profile to the settings we setup. - To check whether it was successful, you can use
sudo journalctl -u webhook-tunnel -fto see generated logs from this service.
That’s it! Now to configure the public server.
Step #2: Modifying DNS for Quality of Life Improvements
This section is optional but highly recommended. Instead of remembering your SSH tunnel port, you can add a DNS entry for it. This plays especially nicely when already have a DNS record pointing to a private IP range (e.g. http://voicebox.aaronloo.com/), and want to use the same record when making queries on your public server.
First, we make changes to our /etc/hosts, so the device will query itself instead of resolving the URL.
ubuntu@public $ sudo vim /etc/hosts
127.0.0.1 voicebox.aaronloo.com
Since the /etc/hosts file only resolves hostnames (and not ports), we need to leverage nginx as a reverse proxy to our SSH tunnel.
ubuntu@public $ sudo vim /etc/nginx/sites-available/tunnel
server {
    listen        80;
    listen        [::]:80;
    server_name   voicebox.aaronloo.com;

    allow         127.0.0.1;
    deny          all;

    location / {
        proxy_pass http://localhost:8500;
    }
}
ubuntu@public $ sudo nginx -t
ubuntu@public $ sudo systemctl reload nginx
Things to observe:
- The
server_namedirective mirrors the DNS record in/etc/hosts. - The IP filtering is important, otherwise you could craft a request that directly hits your SSH tunnel. For example,
curl http://<ip> -H 'Host: voicebox.aaronloo.com' - The
proxy_passdestination points to the port which the SSH tunnel is established at.
Done! If you were successful, you should be able to hit your private network device on your public server with an invocation similar to the following:
ubuntu@public $ curl http://voicebox.aaronloo.com
Step #3: Redirecting Webhook Requests
This section is very dependent on your chosen webhook server. Personally, I use https://github.com/adnanh/webhook as a lightweight server. Its features are sufficient, and it allows me to focus on the scripts that are run upon webhook invocation. This is an example config for this server:
{
  "id": "test-hook",
  "command-working-directory": "/home/ubuntu/webhooks",
  "execute-command": "./redirector.py",
  "pass-arguments-to-command": [
    {
      "source": "string",
      "name": "http://voicebox.aaronloo.com/path"
    },
    {
      "source": "entire-headers"
    },
    {
      "source": "entire-query"
    },
    {
      "source": "entire-payload"
    },
  ],
  "trigger-rule": {...}
}
Whatever you use for running your webhook server, your redirect script can look something like the following:
#!/usr/bin/env python3
import argparse
import json

import requests


def main():
    args = parse_args()
    requests.post(
        args.destination,
        headers=json.loads(args.headers),
        params=json.loads(args.query),
        json=json.loads(args.payload),
    )


def parse_args():
    parser = argparse.ArgumentParser()
    parser.add_argument('destination')
    parser.add_argument('headers')
    parser.add_argument('query')
    parser.add_argument('payload')

    return parser.parse_args()


if __name__ == '__main__':
    main()
And there we have it! Complete end-to-end flow.
Alternatives
Before attempting SSH tunnels, I tried a variety of solutions. These are a couple of them, and why I chose not to pursue them:
ngrok
ngrok creates TCP tunnels to your local network in a simple to use manner. It spins up a random subdomain on ngrok.io, which can be accessible anywhere on the internet. This is super convenient for prototyping, but it did not meet my requirements. Specifically:
- The raspberry PI would still be exposed to the internet, but protected by Basic Auth. It’s certainly better than mere port forwarding, but not a level of exposure that I was comfortable with.
- There was a cap to free version tunnels. This does not scale with the amount of raspberry PIs that I wanted to set this infrastructure up with (and I did not want to pay for additional tunnels).
- Free version tunnels only last 8 hours. I did not want to pay for a longer time period, especially when this tunnel intends to be a long standing tunnel.
For what it’s worth, the “Basic” plan (at the time of writing) is equivalent to renting a DigitalOcean droplet, so the trade-off is maintainability with flexibility (the latter allows you to do more with the droplet, but require self maintenance).
localtunnel
localtunnel is an open source version of ngrok, and attempts to do similar product offerings but provided as-is. I tried setting this up, with the appeal of having TCP tunnels on a whitelabel domain without paying for it, however, I encountered several firewall issues that blocked my progress.
In my fork, I did make several changes to the original code (which seems unmaintained?) including adding auth tokens (for creation and access of web tunnels) as well as bug fixes and other improvements to developer happiness. It was unfortunate that I was not able to see this effort through.
pubsub
My original attempt was to subscribe all devices to an internet-facing pub/sub queue, that only published events to authorized registered subscribers (leveraging public key cryptography). However, building API support on top of this solution proved far more effort than it was worth, and this was (thankfully) abandoned.
Conclusion
I hope this guide has been helpful in enabling you to proxy webhooks to your private networks in a secure, cost-efficient and (home) scalable solution! For more interesting projects like this, watch this space.
